In this section of the research website, I'll be putting what I've learnt into practise. For example, I shall be talking about exposure, shutter speed, focal points and investigating into old techniques vs modern techniques within Photography.
SWOT Analysis
Strenghts
Weaknesses
Oppourtunities
Threats
| PESTLE Analysis
Political
Economical
Social
Technological
Legal
Environmental
|
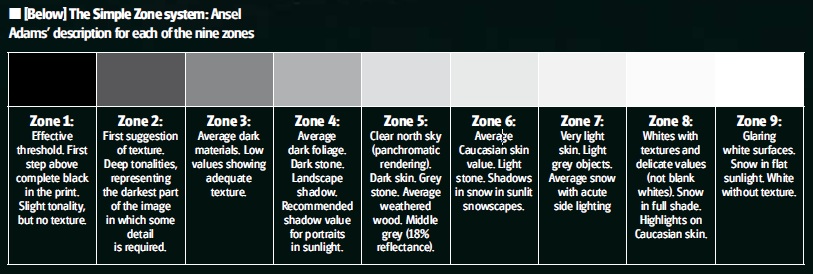
Exposure
Exposure is most commonly described as the amount of light that enters the lens and falls onto the sensor when taking a photograph. There is no right or wrong correct use of exposure, however when an image is taken with the wrong ISO, the image can become grainy. Exposure is used to create a mood within the image and can normally tell the emotion within the scene. To get the correct exposure within an image, you need to balance the other factors such as shutter speed, ISO and the aperture. On your DSLR, there is a certain feature which you can use to control the exposure, this is called 'Through The Lens Meter' (TTL). It automatically measures the amount of light coming through the lens and it also takes into consideration any additional lenses to create an accurate reading.
Unlike the TTL meter, a hand held meter is much more accurate when creating the correct exposure on a certain subject. There are two types of hand held meter's. A light reflective meter and an incident meter. A light reflective meter measures the light that is being reflected of the subject, whereas the incident meter measures the light the falls upon the subject. This is more accurate when taking images of a single focal point.
When you're unsure about the exposure compensation, there is a procedure called 'Bracketing'. This is where the camera can manually or automatically take 3 images with different exposure settings. The first one is suggested to be taken using the built in camera light meter, then the other 2 images are taken at one stop under exposed, then the other one stop over exposed. However some cameras may vary with bracketing stops, therefore you may not have to just go one stop, you may be abble to go a half or a third.
Another way of measuring exposure is a Histogram. Unlike just measuring the light, the histogram mode allows your camera to evaluate the tones in the picture through a graph. To get a balanced image, the graph must show a small hill like shape with the tip of the hill in the middle of the graph. The even space each side of the mountain represents that the image has balanced light and dark tones. Its simular to when looking at the exposure compensation bar, if the hill is further to the left of the graph, it's under exposed, whereas if the hill was swayed to the right of the graph, the image is over exposed.
Depth of Field, Focal Points and Apperture
Like shutter speed, aperture and depth of field can work together to help create a visually interesting image by creating a spot of emphasis on a certain object within the frame. On manual mode, you need to balance the aperture alongside the shutter speed to get a correctly exposed image and it is the aperture that also controls the depth of field. Depth of field represents the area within a photography which is in focus. This action enables you to create a focal point within the image away from any unwanted clutter in the rest of the image.There are two main different types of DOF. Shallow DOF is when the background is out of focus, whereas deep DOF is where the whole picture is in focus. The focal points within an image can be adjusted by the apperture, depending on which f-stop your camera is set on. However, you also need to take into consideration that the f-stop is also a big factor on getting the correct exposure.
By using a large aperture, this alows more light to hit the sensor, causing the camera to use a fast shutter speed. Whereas using a small aperture will require a long shutter speed to ensure the correct exposure. The benefits of having a larger aperture allow room for a smaller focal point as there is an acceptable amount of light entering the lense, which is vice versa with a lower aperture. So putting it altogether, the larger the aperture, the lower f-stop, which creates a faster shutter speed allowing for a smaller focal point and vice versa.
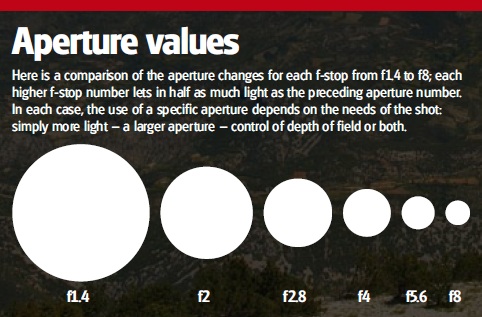
(Photo from an article in The Digital Photographer)
As well as the depth of field, a DSLR can have focal points built in to help compose an image.
ISO
The ISO (International Standards Organisation) is a term to describe a camera's light sensitivity adjustment. Before the first digital camera became available in 1990, a traditional camera used its film to select the ISO setting, where as these days DSLR's can select an ISO automatically. When understanding ISO , the smaller the setting, the less sensitive the cameras sensor would be to light, whereas a higher ISO such as 800 the more sensitive the sensor is to light.
These are the most common settings of ISO:
ISO 400 - Sunny day
ISO 800 - Cloudy Day
ISO 1600 - Twilight
To describe the above, the lower light scene which you wish to shoot in, the higher ISO will be needed. This way you can avoid using flash and still have great control over your image. This is a benefit to such places where flash isn't allowed. However, in low light conditions you have to be aware of camera shake, therefore using a tripod and using a high ISO can stop this. Shutter speed can also be affected by ISO. Reducing ISO can help slow down the shutter speed, helping to create a motion blur within an image.
You've got to be careful when using a high ISO that the image doesnt gain any 'image noise'. Image noise looks like small red and blue grain over an image and is caused when the camera is trying to produce an image of a too high quality. You can avoid image noise by turning on the image noise reduction system or in post-production using a noise reduction element that can be found in most image editing applications.
Framing
Shots are all about composition. Rather than directly pointing the camera straight towards the subject, you need to plan and compose an image. Framing is known as the process of creating composition and the rules of framing our essentially the same for photography and film. However, various styles of framing can have different meanings to people. What one person may find dramatic, aother may believe it to be pointless.
The Rule of Thirds is a division between the frame. This is where the image is set into nine sections. These nine scetions act as 'Points of Focus' and make framing a lot easier.
 |
When framing an image, you've got to think about the "Headroom", "leading room", and "looking room". These three terms refer to the amount of space in the frame which is left empty.
Head room refers too the amount of space which is left between the top of the frame and the subjects head. In most shots tighter than a medium shot, there should be little space left in the headroom or theres a risk of the image looking visually un-interesting.
Leading and Looking room is the space left within the shot for the subject to move into or to look into. Without this empty space, the framing may look out of place and uncomfortable.
Various Lenses
Normal Lens - 50mm lens with a 46 degree angle which gives a natural perspective and a moderate wide aperture of f1.8.
Zoom Lenses - Using recent design techniques, wide angle and zoom lenses can now be manafactured to adequate optical standards. These lenses make it able to zoom up to the finest detail. Lenses can be 80-200mm, 35-80mm, 75-300mm, 28-80mm
Shift Lens - Lenses with perspective correction which allow the lens to be moved laterally. Mainly used to avoid converging vertical lines in architectual photography.
Macro Lens - This lens is intended for optimum use at close distances. It has a 100mm f2.8 lens
Wide Angle Lens - 20mm lens with an angle of view at 94 degrees. Uses a retro focus design to lengthen its extremely short focus so it can be used with the reflex of the mirror.
Fish Eye Lens - Deigned for a pictorial effect. It has a f2.8 15mm full frame fish eye that covers an ablge of 180 degrees
From the book Michael Freemans Creative Photography